• Note:
▪ You will need to purchase a service manual from Polaris to complete this install or you will need to take it to a certified dealership. Removing and reinstalling the engine cover and sensors is fairly precise and should not be attempted without the service manual, proper tools, and adequate mechanical know-how.
▪ This kit was designed and intended for racing purposes and thus carries no warranty. (Except for the alternator itself which has a 1-year warranty from Race Proven) Slight modification to these instructions maybe needed for each specific application.
▪ The battery that the alternator is connected to must be charged to at least 12.6 V before the alternator is connected. If the battery charge is below 12.6 V the alternator will not power up.
▪ Green wire goes to a 12v ignition lit wire (non-constant voltage. e.g. not to the battery). The Yellow wire is for an alternator failure light. Failure light is not included and not
required for use. Clip and cap this wire if not in use.
▪ Power wire is not included. 4G wire is recommended to run from the alternator to the battery.
1. All bolts on the cover come loose from ZRP and need to
be torqued except for the two nuts holding on the two
pullies which have been torqued from the factory.
2. Reference the service manual to remove the stock engine mag cover.
3. Once the stock cover is removed, transfer the stator,
all sensors and plugs from the stock cover to the ZRP
billet engine mag cover referencing the service manual.
4. Remove stock crank/flywheel bolt & washer. Install new
ZRP Crank bolt (Do not reuse washer). Use blue Loctite
and torque to 100ft-lbs, loosen the bolt and re-torque to
133 ft-lbs. Double check this torque spec for your specific
model year and engine.
5. Remove pulley bearing pack and alternator mounting
arms from mag cover before installing installing mag cover
bolts.
6. Install the Mag cover referencing Polaris service manual for mag cover install procedure including torque specs and sensor tolerances.
7. Insert bearing pack into the cover and align bolt pattern. Tighten bearing
pack bolts to mag cover.
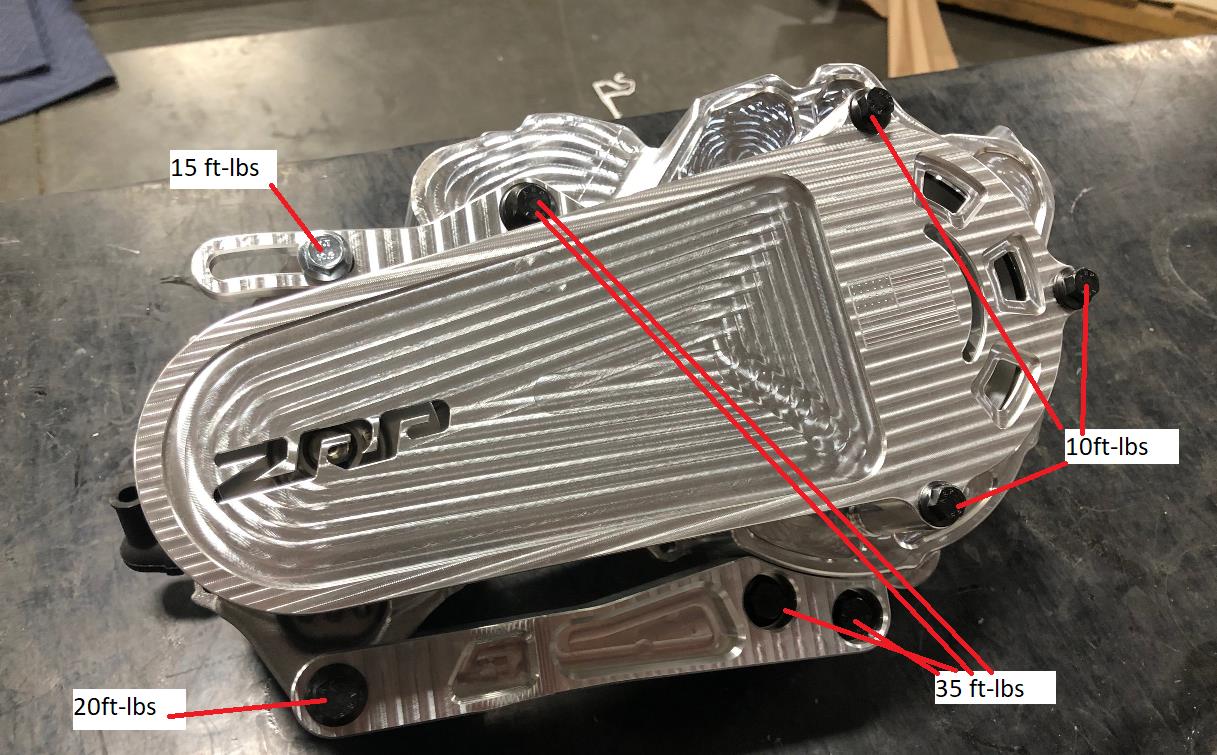
7. Tighten Belt and torque bolts as shown below. Use blue
Loctite on all bolted joints associated with the alternator.
Torque with an appropriately sized and high-quality
torque wrench.
a. Bearing Pack Bolts – 6ft-lbs
b. Belt Cover Bolts – 10ft-lbs
c. Alternator bracket bolts – 35ft-lbs
d. Alternator bolts- 15-20ft-lbs
. Make sure all hoses are secure and away from sharp
edges.
. Check alternator belt tension after the first hour of use.

